Showing posts with label kitchen. Show all posts

Monday, June 6, 2016

The new house

As the husband so kindly pointed out....it's been more than a week since I last promised to share pictures of the new house. Yikes. The month of May came as fast as it went, and brought with it a nasty stomach bug (for me), our anniversary (that we still have yet to properly celebrate), a wedding, and a certain someone's first birthday and subsequent party. #excusesexcuses

ANYWAY. Here we go! Time to (finally!) share pics of the new house! Can you believe it will be two years in July that we've lived here? Some days I feel like we still live in someone else's house, and other days I look around to see just how much we've done to this home since we arrived.

So without further ado....the living room before (on move-in day):


And the after (but more like "progress" since "after" is just crazy talk):


Hands down, the living room is my biggest challenge. It's a formal living space! A family room! A place for the kids to play! In short? This room has multiple personalities. Coupled with the fact that the layout is super weird. The room is long & off centered. And the multiple doorways and windows make furniture placement tricky. On one hand, I love all the natural light that the room gets. But would I prefer our television to be somewhere else but smack dab over the fireplace? You bet. But sadly, the fireplace is the only option at this point. And the wall behind the couch has been awaiting some form of art for way too long than I'm proud to admit. Basically, this room has some work ahead of itself. #workinprogress 

The dining room before:


And after:


The dining room was a pretty straightforward space. We painted, added some DIY art, and replaced the light fixture with our old Restoration Hardware fixture we had at the previous house. I'm sure I'll want to change things up in here at some point, but for now the dining room is simple, streamlined, and the only zone in the house that doesn't look like we live in a three-ring circus (because we do).
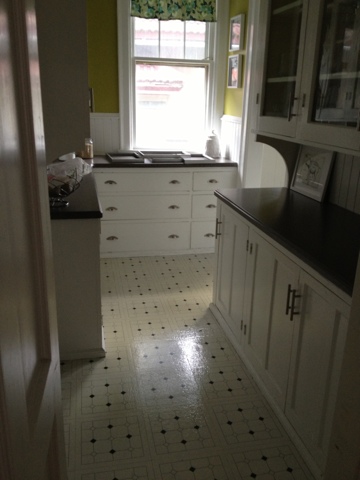
The Kitchen:


With the exception of some new valances, table & a dishwasher, this kitchen is pretty much looking the same as it did on move-in day. While the space is nice (hey, I have no complaints about a new kitchen) it's definitely not our style. But one of my favorite things about this space is the eat-in area. I never realized how much I would love (and need) an eat-in kitchen until we had kids. It means our dining room is largely ignored, but I wouldn't trade an eat-in space for anything.

We have big plans to lighten things up in here (which should come as no surprise to anyone who knows me!). In the meantime, we'll live with the way things are for awhile. But I'd be lying to say that I wasn't itching to get things changed up in here. Like yesterday.

The half bath:


The mirror has been changed up & the shelves met their fate with a garbage can. But otherwise, what you see is what you (still) get in here. With the weather warming up, we've shifted our focus to outdoor projects, but this space is next on my radar. We plan to add picture molding, marble hex flooring, a new light fixture, faucet, paint & art. Not that I'm wishing my summer away already...but I'm super excited to get working in here.

The basement:


We've moved some new furniture down here, mounted a t.v., and replaced the carpet (after a major plumbing issue last summer). But as it stands, things still look the same down here. Only with more toys. Because, two kids.

So there you have it! It took me nearly a month to put this post together. Which means you'll get to see the second floor three years from now. You're welcome. If anyone has any questions about room sources & colors, feel free to ask at  smigelkm@yahoo.com!


Wednesday, July 17, 2013

New kitchen floors!

So we got new kitchen floors. Almost 4 years post kitchen remodel (but who's counting?). Whew. So now that that embarrassing admission is out of the way...

We finally got around to having the floors replaced 3 weeks ago. It was one of those moments of "why didn't we do this sooner"?! We're so, so happy with how they look. And naturally, I meant to share photos sooner, but life just got the best of us. We spent some time at Lake Chatauqua for the 4th where this cute face enjoyed the water & two boat rides for the first time in her life.


I'm kind of obsessed with her. That's why I don't blog much. I'm sure you understand.

Anyway, we just got the 'ol bill for the floors, so I figured that was an excellent reminder to finally share pics of our kitchen, alright already.

Lest you forget (or have blocked from memory) the beauty that was the before....


Mmmm...tasty. I have no idea why our realtor insisted we have these updated before listing our house.
  
So anyway, what was supposed to be a 2-day job, turned into a 3-day job (raise your hand if you naively believed the flooring sales guy when he tells you it will only take two days....ME! ME!). The contractors worked their tails off while they were here. Which I suppose makes it easier to cope with the fact that I took a day off of work to accommodate the new schedule. Because I would have been uber ticked had they been sitting around & picking their noses the entire time.
 
Day one: the old floors come out & the subfloors are in! This seemed to be the most time consuming part of their job. And to think that the husband wanted to do the demo (this is after talking him down from doing the ENTIRE job himself...of which he has zero experience in the tiling department, btw). Yeah, ain't nobody got time for that.


Proof that I was too lazy to move the fridge when we painted, oh....3.5 years ago.


By the way--things still look the same back there. Hello my name is: LAZY.


While all of that was going on, the rest of our house was looking a little something like this...


I have no idea why I was so stressed out for 3 days. Because, feeding a baby next to a stove in the dining room is totally normal.
 
 
Day two: tile is in! Woot, woot!


Meanwhile, down the hall, someone was perfecting her crawling skills when she should have been napping.


We've since lowered the crib after we discovered that she also figured out how to grab the monitor & play with it in her crib. Never a dull moment around here...the baby proofing has begun!
 
 
Day three: a new crew came back to grout, install thresholds, & moldings--a supposed 2-hour job that turned into an all day event. Again, I guess I can't be too upset as they continued to work their hind ends off. Those, my friends, are the types of contractors I love to work with...the one's who you don't have to babysit, who do their job, do it right, clean up after themselves & then get the hell out.


And here ya go...official "after" shots of the kitchen...


It's almost impossible to take pictures of this space, since it's enclosed and small (but this should give you an idea, right?). I also didn't bother to remove the crap from the fridge or clean up the counters before taking these pictures. Styled shots aren't our reality folks! The bottles, box of Cheerios & vitamins is our everyday life. Although, true story--our pantry really is that tidy & and organized on a daily basis. And that's saying a lot since a certain someone--cough, husband, cough--never puts anything away.
 
So there you have it, the kitchen! Now what project can we start working on next? 


Thursday, April 26, 2012

HomeBads

Our HomeGoods is pretty HomeBads right now. It's undergoing a renovation and there's a lot of controlled chaos going on in there. Not to mention the merchandise is pretty blah. I suppose when everything is crammed into narrow aisles & spaces, there's not much room for anything new or exciting. Yet that doesn't stop me from going on a regular basis...that gift card from my birthday has been burning a hole in my pocket since March!

I've been itching for some organization lately. Our house is in a constant state of chaos, and I just can't keep up. I figured it's best to start small, and after seeing this idea for a dish soap dispenser, I was on board!


I found this olive oil dispenser for $3.99 & figured if it didn't work...meh, I was only out some spare change. Plus, it would save the husband from having to bend down and get the soap out from under the sink. See, now we're organized and the husband can't make up excuses as to why he can't do the dishes. No bending required! 


It remains to be seen if this is the most efficient way to dispense our dish soap, but again....spare change people, spare change. We could always go back to the under-the-sink method of storing things. But then the dishes just wouldn't get done. Knowing when to exert your efforts is sometimes a difficult decision.

On a totally unrelated note, I started using Picmonkey to edit these photos! Mild panic ensued when Picnik closed it's doors, but so far Picmonkey seems to be the best replacement (I suppose it should...I heard some old Picnik folks started it!). Free and no registration, thank you very much. More effects are coming soon, but so far I must say, I like.

Hmm....how's that for a really exciting post (about soap, no less)? Betcha wish you could get back those 5 minutes of your day!


Tuesday, January 24, 2012

Let there be light!

Something tells me I've used this title in a blog post before. In which case, we'll just refer to this as "Let There Be Light 2". I've never been a fan of sequels, but in this case, I am...

We finally tackled the awful lighing issue in the kitchen. Which, it's about time! We only remodeled the space over a year ago, but never bothered with the little details like lighting or floors. I know, Miss Attention to Details here....honestly, sometimes even I surprise myself.

Anyway, this is the beaut that we were working with before...


I'm aware that taste is subjective, but seriously, the creator of this light fixture should go to lighting prison. The lighting was never appropriate for the space (seeing your food while preparing it is usually a big plus), not to mention this thing was a huge bug collector (trust me, you don't want to know what was hanging out in there when it was taken down...for reals...).

So off I went in search of something new. The husband gave me free reign to figure this one out on my own, which is totally what I love about him. Although, given that the kitchen is his domain, I figured I would hear about it later if he didn't like it (Oh well. I'd cross that bridge when & if we got there...right?). I searched the local reuse stores, but nothing struck my fancy. In the end, I settled for a $35 clearance light from a local hardware store....


And by clearance I mean, they took it off of the display & I hauled this baby out of the store without the box, nor option for return. Which made me a little nervous...I mean, who the hell knew if this thing even worked or not? But for $35 I was taking my chances.

Okay, so I have zero shots of the in between process, but you'll get the picture...prime, spray, and then in a classic rookie mistake apply gloss enamel over gloss paint and watch your DIY project go up in flames. Okay, not really. But instead just watch the paint peel away from your light fixture. And then panic. And then run to another location of said hardware store, praying that you'll find another $35 clearance light fixture (which you do), until finally coming to your senses and realizing the small area that was sprayed with enamel is totally fixable if you just calm down already. I'm happy to report I took a second to relax, review and form a plan of attack (but not without screaming multiple expletives in the process). Turns out the problem was fixable, but cost me a few extra days of work in the end. The fixture is still not perfect, but do me a favor...don't look for the imperfections when you come over to our house, mmmmm kay?


I replaced the existing bulbs with round ones & added a $15 ceiling medalion from Lowes. Then I ended up buying a second set of bulbs since the first ones blinded us everytime we turned on the damn light. And best of all...it's all husband approved!

Oh, and I ended up hiring an electrician to do the work. I know, that's not very DIY of us (especially considering the husband would typically do it). But with the husband busy & an upcoming girls' night at our house just days away...sometimes it's just easier to pay the professionals $185 for 3 hours of their time. Easy-peasy.

I've been working on a few fun projects lately, which explains my abscence from blogland. But I'll be back to share some updates and pictures soon!

Friday, October 14, 2011

E-A-T!

Um, so how did a whole week go by without me knowing? It's as if I blinked and wooosh (which, yes is a technical term) it's Friday! Which is a good thing. A really, really good thing.

Okay, onward and upward! So I'm back and ready to share some before & after photos of the letters I scored at the Country Living Magazine fair last month. Need a reminder of what they looked like before? Of course you don't, you saw them last week. But what's a before & after post without seeing the before pics again, right?


These plastic letters were $12 each. I wish I could recall the name of the booth where they came from, but I was too busy sweating & fighting off fair folk to pay any attention. I can tell you, however, the man running the booth was wearing really tight cowboy jeans. How that's relevant to this story, I'll never know. But I thought it was worth mentioning. Now there's a visual for you!

Anyhoo! After rummaging through a few baskets I was able to find the letters I was looking for. They were all pretty scuffed & scratched but I wasn't worried about that since the intention was to paint them anyway (you know me, right?). Aside from a small hairline crack--not to mention the warped, wonky nature--in the "a", the letters were looking pretty good. So after a quick wipe down & 2 coats of Valspar Cherry Red....we were in business! The letters looked amazing, if I should say so myself.

Then I got down to business removing the existing pictures from the wall, hanging the letters & rearranging the pictures into a modified gallery around said letters. Okay, that sentence made no sense, but you'll understand that nonsense when you see the after pictures. Here's the before...


About 2 hours, a whole lotta breaks for wine & the latest episode of Teen Mom later, I was finished! And then I made the single worst mistake of the entire process. Tooting my own horn. After turning out the lights & heading to bed, I heard a loud crash in the kitchen. Make no mistake what that was. The wonky letter "a" came crashing down, taking 3 pictures with it. Remember that "small hairline crack"? Well, the "a" had officially split into 3 pieces.

I was devastated. And I know that sounds really dramatic, but after 2 glasses of wine & all that work, you'd be devastated too, right? I figured the best thing to do was to walk away and figure things out in the morning. But I just couldn't. So I spent the better part of 45 minutes (and a little Chelsea Lately to lighten the mood) super gluing and taping the thing together. Here's the classy outcome...


The following day I went over things with another coat of spray paint (not my best effort, but eh...it will do). Things still weren't back to the way they originally looked, but I feared that doing too much beyond that point would only make things worse. So I gave up...for now.

After all of the drama was said and done, I give to you the final (I think?) results!


Given everything that happened to get to this point (my emotions are somewhat settled by now), I'm quite pleased with the outcome (as is the husband...bonus points)! The pictures are crappy, I get that. But after living with things for the last couple of weeks now, I'm loving the totally unexpected look of this wall. Betcha didn't see that coming when you round the corner into our tiny kitchen! I think I'll add a few more frames to the montage at some point, but for now things are staying just as they are. I wouldn't want something else crashing down on me!

Happy Friday my friends!

Blog Design by Get Polished