Tuesday, November 29, 2011

Another one under our belt...

It's official. We have another thanksgiving under our belt. And this time we did it with a fully operational kitchen! It's the simple things in life, people. If you need a reminder of the hilarity that ensued last year...knock yourself out. And feel free to laugh your ass off when I mention in the post that we're "not it" for hosting duties next year. Joke's on me, apparently....

So for anyone who knows us, you're all aware that the husband does the cooking & I'm in charge of decorating. Up until about 2 days before the big event I had ZERO clue how this was all going down. Until Katie Bower & her burlap entered the picture. So off to Lowes I went. And with a $10 roll of burlap in hand, I intended to make this the most burlap-tastic thanksgiving you ever did see!

I started out by layering what I had on hand...tablecloth, burlap, random wooden runner....


Now, I know things are looking a little iffy with the mismatched chairs & teeny, tiny random wooden runner. But just go with me here. Teeny tiny is gonna come in handy when we start adding in the centerpieces, plates, napkins...and oh yeah, food.

Next came the apothocary jars, fresh flowers, tea lights & a thrifted gold bird and terranium...


The flower arrangments were pre-made from Wegmans. I hesitated at the $19.99/each price tag (I know, I'm cheap). But when I started picking & choosing to create my own arrangements, I had put myself well over $20...so we just went with it. I'm not a professional florist (oh, you didn't know?), so Wegmans won in this case. I already owned the square vases & then wrapped each with ye 'ol burlap. Are you sensing a theme?

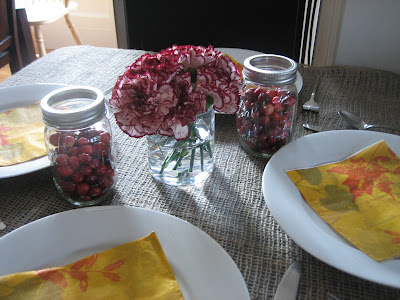
Then out came the china and napkins, wrapped in....you guessed it, burlap.


Our guest list included 14 adults and 2 children (more than the main 'adult' table could handle), so I was forced to set up an ugly stepchild 'kid' table. Even Phil Dunphy's thanksgiving day bistro tables were way cooler than this.


The kid table sported some super fancy paper napkins, more cranberries & a small floral arrangment. And you guessed it...a burlap tablecloth. The kid table was definitely not as cool as it's big sister, but again, I worked with what I had and our guests were none the wiser.

And lest you think the giant cornucopia went away....


....it was displayed on the buffet, with some other large serving pieces. No need to remove this thing once dinner was served, as it fit in just perfectly this year!

So that's it my friends. Another successful (however you define it) thanksgiving under our belt. Bring it on year three!

Thursday, November 17, 2011

I've been so busy, I forgot I had a blog.

Or the other appropriate title would be 'Our house got robbed & in addition to life, I've just been waaaay too busy dealing with insurance, detectives & security systems to think about this here little blog'. But that would be too long of a title, now wouldn't it?

So yes, I've been an absentee blogger these days. In one of those "it will never happen to me" moments, our house was robbed last week. It's not fun, it's not glamorous, and I sure as hell find myself a little (okay a lot) nervous to come home alone most days. We were lucky in that the intruder made off with mostly jewelry (some of which were family pieces, that sadly, we'll never see again) and the sister's netbook & ipod. Ironically, said intruder was relatively respectful of our property, with the exception of this....


They kicked in our side door, taking the interior moldings & half of the wall with it. Lovely, eh? As upset as we were about the robbery itself, this door nearly put me over the edge. What a freaking mess. Luckily, the husband's contractor friend showed up bright & early the next morning to repair the door (we'll replace it as soon as the insurance settles, whenever that may be....), and we were able to rid ourselves of those projection screen stands that temporarily secured our door.

Ironically, the bulk of the mess came from the police & their fingerprinting dust....


Area rug....ruined. I crossed my fingers that the insurance adjusters would have sympathy & tell me to purchase a new rug ASAP. But instead, they told me to call a cleaning service to remedy this little issue. Which isn't so bad, I suppose. But it's certainly not the West Elm or Crate & Barrel replacement I had in mind...

But onward & upward! It's time to move on & get to some stuff I meant to talk about earlier this week. We finally got around to replacing the light in the real, real entryway. Remember when I dabbled with the idea of having a professional come & install overhead lighting? Well guess what...a $29.99 sconce from Home Depot won.


I begged the husband to replace the light right away. Afterall, I'd be welcoming my book club friends through these doors in a matter of days & people generally like to be able to see where they're going when it's dark. Which ended up being just one big LIE, since the real reason we needed a light was to welcome our friends to the husband's surprise, "Yay! You have an MBA!" party (I got really good at lying that week....).

But sadly, the light is just decorative at this point. The wiring is all f'd up. I'd always wondered why the old light never worked? Well, there you have it. The husband was so annoyed with this fact that after a solid 30 minutes of working, everything got tossed aside in a huff. And we're no further along than when we started. But it sure does look better! 


I also finished painting the steps. Hoorah! Lack of lighting kept me from tackling this project on weeknights, so whenever a spare moment presented itself on the weekends, I was painting (scratch that...I was actually frantically painting a mere days before the husband's party....I'm the poster child for procrastination). 


Oh my. I looooove that this is complete. Amazing what some painted risers can do for your home! I'm still debating about installing a runner, but that's way down the line, if ever. Snow & salt is much easier to clean off the wood floors!

So that's about it! I'm hoping to get my house mojo back in action...enough to be posting more frequently! With Thanksgiving just around the corner (um, quite literally!), I'll be sharing my thoughts & ideas for how we'll be celebrating next week.

Hint...this year it involves a kitchen. Just sayin'.

Wednesday, November 9, 2011

DIY cake stands

I'm back to share my mini-tutorial for the cake stands that debuted at the husband's "Yay! You have your MBA!" surprise party this past weekend. Honestly, this project was so easy, I'm not even sure why I'm sharing the deets. But for the 3 of you who are interested....you're welcome.

I found these fabulous ikat plates at HomeGoods. They were so fabulous that the lovely sales girl almost convinced me to buy the whole set. And then I realized bringing home an entire set of plates "just because they're cute!" probably wouldn't go over so well with the husband. Anyhoo! Moving along.


The next step was thrifting for the bases, which ultimately turned up nothing. So I went with these large candle holders from HomeGoods (I loved that they were substantial enough to hold their own against the plates).


But sadly, these babies just weren't meant to be. After several coats of glossy spray (and no primer...although, I'm not sure that would have made a difference), these things were a disaster. They had drip marks & uneven coverage. You'll have to trust & use your imagination here, because I was too devestated by the results to take any "after" photos. Not to mention it was one day before said party & I hadn't a clue what my next step was going to be (aside from opening the garbage can & inserting stupid, disasterous looking candle holders...and then crying).

So I frantically drove myself to two separate Michaels (forgetting my coupons...but of course!) before locating these lovely wooden candle holders. I figured paint would take to the wood base of these much better than the stupid, glossy ceramic ones (which were taking up residency in the garbage can). Sorry, no can do on the before pics...we were t-minus 12 hours until go-time and I had to get my paint on! But here's what things looked like after 3 coats of glossy yellow paint...


Ah, much better! I went the easy route & attached the base to the plate with super glue. And after it dried, I realized a more temporary solution (possibly velcroe?) would have been a better idea. In the end, it was all a moot point, since the husband ripped the plate from it's base when tossing the old cupcakes into the garbage. And whoever said the husband doesn't have brute strength just doesn't know what they're talking about!

Anyway, I give to you the lovely after....


And with some party treats...


This project was so easy & something that can be used for a variety of entertaining needs. Sort of like tonight's book club that I'm hosting. Which means I've gotta bolt....I'm off to get my entertaining act in gear!

Happy hump!

Tuesday, November 8, 2011

Wife of the year here...

I've been a busy, busy girl these past couple of weeks. Between life, work and um, this....


Yep, that's doggie with a bum foot. You know, just your run-of-the-mill open foot wound issue (ouch!). For the record, that may be the last time the husband takes him to the cabin by himself (I'm guessing there wasn't much supervision happening that weekend). At any rate, that little wound set us back some cash, not to mention time. We visited the vet no less than 3 times in a 5-day period. I like our vet, but I could do without seeing her as often as we did last week.

In addition to the chaos that was our life, I decided to throw the husband a surprise MBA graduation party (you know, for that MBA he received in August...hello, wife of the year here!) Nothing like getting my act into gear 3 months after the fact. After weeks of running around & planning every last detail of this shin-dig, I'm happy to report that everything went off without a hitch. The husband was pleasantly surprised, even after seeing 3 friends walk in the door before him. He's nothing if not observant.

For some reason, I didn't bother to pick up the camera come party time. But I did manage to snap a few photos of the details beforehand...


Yes, I'm aware that the details of this party were a little girly, but look...it's my party & I'll plan how I want to! And for anyone looking for details, here ya go....

**The banner was made from paint samples courtesy of Home Depot (strung together with the husband's bakers twine & stamped to say "Yay! You have an MBA!").

**The cupcake picks were also made from HD paint samples (they were circle hole punched & stamped to say "way to go!").

**The graduation caps are Godiva chocolates & Reeses peanut butter cups on bbq skewers & the base is a gift wrapped foam block from Michaels.

**The flowers are courtesy of Wegmans--aside from a professional florist, I can hands down say they're my go-to place for fresh flowers.

And I'll be back tomorrow to share how I made the cake stands! SO easy & so fun....even if I was a little pressed for time & didn't finish these babies until just hours before go-time. Nothing says party time, excellent like a little procrastination!

Blog Design by Get Polished