Showing posts with label paint. Show all posts

Thursday, September 6, 2012

Yep, we still have stories

Perhaps they're not as dramatic as they seemed to be last week, but none-the-less, we still have stories. It seems I'm a bit overdue for an update of any kind these days. And since baby is coming in less than 8 weeks and I'll probably forget I have a blog (or the time to talk about anything house related), I should get on with it.

So first and foremost, we've made significant progress on project hallway: part duex. As you may recall, the husband took care of all of the big stuff. And then I jumped in and helped paint (the no-VOC way, of course!). Then the carpet was installed last Thursday. And since then we haven't bothered to do a damn thing. There is still a lot of paint to touch up, hardware to install, window treatments to be purchased and hung, new light fixtures to be installed, and we need to organize our coats, shoes, hats/gloves back into the space. You get the picture. Busy work.

But let's back track, shall we? Two nights before the carpet was installed, I got started on this little project for the baby's room...


...spraying this $7.99 Salvation Army find. Every good project starts with primer, right (of which, I've learned the hard way over the years)?


Well, I'm here to tell you that this s*&t is for the birds. This worthless crap came flying out of the can like silly string. Then a gust of wind blew through the yard and misted the entire right leg of my black yoga pants. It's a good thing our closest neighbors haven't been home all summer, or they would have witnessed the crazy pregnant neighbor cursing and flailing about the lawn. Also, I'm not getting rid of the yoga pants, so if you see me at the gym and wonder why I have paint on one leg...well, now you know. You're welcome.
 
So, project 'paint the lamp' was officially over for the night (before it really began), and project 'get your ass painting the hallway before the carpet is installed in less than 48 hours' began. Boy, I'm glad we went the no-VOC route so I could help the husband, but I'm not happy we went with this...
 
Natura Paint from Benjamin Moore
 
You guys, never again. I think the husband and I spent the first hour bitching and complaining at how awful this paint was. It was like working with liquid enamel, which as you can imagine was all sorts of fun (especially after working all day & coming home to paint all hours into the night). Once we got a handle on how to work with this paint (it wasn't easy) we spent what seemed like another hour debating about who was the better cutter-inner. I'll spare you the agony of having to guess...but it was me. I've taught myself how to cut in with a good brush (totally key!) and quality paint. But cutting in with this paint proved to be nothing less than a challenge...one that's totally doubled while 8 months pregnant. To add insult to injury, this paint required TWO coats (even with the already primed walls), and as I headed back to our local BM retailer to buy another gallon, I couldn't help but think....well, there goes $120 down the drain. I complained to an associate, to not much avail (as I type, I'm still waiting on a response from the folks at Benjamin Moore...we'll see how well that goes). So, lesson learned. I'm still a tried and true BM fan...I'll just never use the Natura line. Like, ever again.


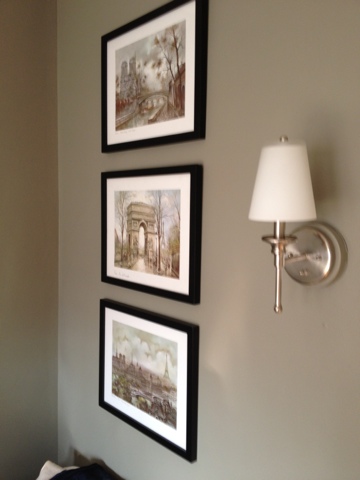
Okay, so here you go...some crappy updated shots of the hallway (in it's current state)! It's so hard to take photos in a space this small, but I think you'll get the general jist.


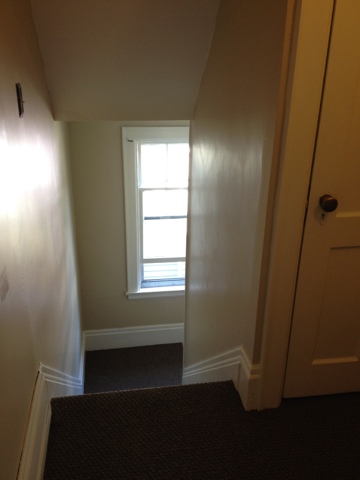
The substituted carpet looks WAY better in person than it did on the sample board. So we're totally pleased with our second choice. We're also loving the color of the walls (see, something good did come out of the whole painting fiasco), and the white moldings totally brighten the space. And the plaster walls also look a heck of a lot smoother in these photos than they do in person...either that or my photography skills are totally lacking (that's probably more like it).
 
So this is the point in my story where you are all thinking, "great Katie...we can't wait to see the finished, finshed space when all your tweaking is done". Well folks, you would be wrong. After the carpet was installed, I headed back to work and found out I got a flat tire from a TACK the carpet guys carelessly didn't pick up in our driveway! Yep, this sort of thing only happens to me, I tell you. The good news is that my year-old tires were still under warranty, so the repair was 100% covered. And after 2 days of silly string-like primer, shitty-ass no-VOC paint, and complete and utter exhaustion...well, that's just about the best news I'd heard all week.
 
With the bulk of the hallway work under our belt, I've been able to dedicate a lot of time to the nursery. Which I'm excited to share updates! I'll be back next week with daily (we hope) updates to show you what I'm incorporating into the space. It's slowly coming together. Now, let's just hope baby doesn't get any funny ideas and come arriving any earlier than she should! 


Friday, August 24, 2012

Project Hallway (Part Duex) progress

This is a post about the.longest.project.in.house.history. For reals people. But we're getting there...slowly but surely.


door to our unit


the view from our unit door


the attic door & utility closet adjacent to our unit


heading downstairs to the lower unit


entry into the house


lower unit entryway
 
 
Props to the husband who's been working tirelessly on this project. Which is probably why it's taking so long, since 'el prego can't be in the space (with all the oil based primer he's been using). Plus, you know...we have lives and full time jobs and went on vacation...so toss all those things in there & that's a major reason this project is taking (what feels like) 18 years to complete. But again, we're getting there and seeing the light at the end of the tunnel. Which is easing my anxiety of getting this damn space complete before baby arrives... 
 
So let's do a little rundown of what's been going on here...
 
We've removed the wallpaper, sanded the walls, skim coated & sanded them AGAIN (in fact, the husband has also patched & sanded other sections of the walls after all of that nonsense...the joys of owning an old home!). The walls & formerly green trim and doors got a coat of primer and the ceiling was repainted. Currently, the doors and moldings are getting their second coat of paint (Dover White by Sherwin Williams, to match the rest of the trim in the house). I hit the panic button this week & called in my mom for this step. She's worked on painting the trim for the last 2 mornings (thanks mom!), since I wasn't so sure we'd have everything painted by the time the carpet gets installed next week.
 
Which speaking of the carpeting, we got a call this week informing us that the one we chose had been discontinued (cue sad music...but not really since this kind of carpet is just carpet). Needless to say, it was a bump in the road, but nothing major. I had the carpet guys pull some comparable samples for us, without a price increase (woo hoo!). We're just eh about the replacement. But in the case of this area, carpet is just carpet. I'll be happy to have anything installed in there at this point. Bye, bye ugly linoleum!
 

If nothing at all, we are totally pumped with how light and bright this space has become. Even if it's all primer and trim paint at this point. Aside from the green to white trim transformation, the utility closets are the other 'why didn't we paint these sooner?' element to the space. Naturally, I didn't take a before pic, but the inside of the closet will show you what we were working with....


With any luck, we'll have a wall color picked out soon and can start painting the walls this weekend! We're definitely thinking something beige-y and light. It's hard to believe we lived with such dark colors in this hallway for so long!
 
TGIF!


Friday, May 18, 2012

Seeing green

We've been super busy this week getting ready for Sunday's house tour. Who knew getting your house ready to show was so. much. work? I'm fairly certain this is the most clean & organized our place is ever going to be. Or at least until we sell it one day!

At any rate, I wanted to take a quick break to share an update to the entryway....a little change that's made this space complete! When this picture showed up on Janice's blog, I was super embarrassed. Sure, the focus was on the floors, but would you get a load of that cabinet?


It was my $35 faux painted, missing a back & has no shelves find. A beaut, right? This thing has been hanging out in our front entryway for the better half of 5 months and really needed a paint job. Unfortunately, I was too busy sleeping during my first trimester. And when I woke up I wasn't able to work with oil based paint. So I enlisted the help of my mom who painstakingly primed for me.


The original plan was to strip the paint....but that just sounded too exhausting and time consuming. So we went the oil based adhering primer & a whole lot of sanding route instead. It didn't produce the most professional of results (what do you want...this cabinet was a $35 dinged up mess), but I must say I'm super happy with the end results!


I styled and re-styled the top of this chest over & over, but nothing was clicking with me. I worked with what I had on hand, but ultimately it was these peonies from Michael's that did the trick. I'm not normally a fake flower person, but these I liked. I paired them with an old vase that we were using to collect wine corks. Voila--styling complete! 


The color is Lime Twist by Valspar--thanks to the green March issue of House Beautiful for that suggestion! But oh my god, this thing was a huge pain in the ass to paint. It required 1 coat of primer & 3 coats of paint. I think it speaks to the quality of the paint (I'm not a huge Valspar fan, unless it comes in the form of spray paint), and the fact that this chest is way more detailed than it looks! All the nooks, crannies, twists and turns...this baby has me longing for a quality spray painter. One of these days...

Anyway, there's no rest for the weary...I'm back to getting this house into shape! Hope to see some of you on Sunday!

Monday, April 30, 2012

Some before & afters (without the befores)

I got a little spray paint happy this weekend. It had been awhile, so my hot little hands got a hold of some gold spray paint, and away we went! Naturally, I never thought to take before pictures. When I've got a project on the brain, I've got all I can do to pick up a camera. High tailing it to the finish line is far more important!


Awhile ago I had the genius idea that this formerly oil rubbed bronze bowl would look way better gold (I thought about it a solid 3 months before pulling the proverbial spray paint trigger). I had just purchased the sculpture-like sea creature above, with full-on plans to make it gold. So, as they say...have gold spray paint, will spray everything gold (or something like that). I'm loving my new gold sculpture-like sea creature. But the bowl? Not so much. These pictures don't do it justice, but it's so gold, it looks like one of Liberace's Goodwill outcasts.


Maybe my expectations for a spectacular after were too high? Or perhaps I sat on this one for way too long, overthinking the whole thing. Yep, that's it. So I'm planning to live with the results for now. Mostly because I'm too lazy or cheap to go out and purchase some oil rubbed bronze spray paint. It's the age old question....what would you do?


Friday, February 24, 2012

Master bedroom updates!

Okay, here we go...I'm back to share some master bedroom updates! I'm all out of wit and candor today, so instead you'll just be getting some crappy pictures & a bit of commentary on what's currently going on in there (besides the usual mess of clothes, books, etc...hey, at least the bed is made!). Mmmmm, kay? Here we go!

So two weekends ago I got down to business & painted. Painting a room is so exhausting to me, especially the prep work. Seriously, prep works makes me want to just live in the old and forget the new. It's more of an effort than the painting itself! But recently I taught myself how to cut in with a good brush, which pretty much eliminated the need for tape (and because I'm neat, I really didn't bother with a drop cloth either). I'm telling you people, a good brush makes all the difference in the world! I use an angled brush by Purdy (I'm not sure the dimensions, but I don't think that really matters...it's whatever you're comfortable holding). The paint was a low VOC & paint/primer in one from Benjamin Moore, which required only one (count 'em....ONE!) coat to cover that burnt orange/brown that was previously in there. From me to you...I thank you Benjamin Moore. Lazy painters of the world rejoice!


Yep, how's that for a set of crap-tastic photos! But you get the point, right? Anyhoo, because these pictures were snapped in haste, the the color is not true to what we're seeing in real life. It's definitely cooler with more blue undertones, but at different times of the day it looks brown. To say this color took some getting used to is the understatement of the century! When I started painting, I actually stopped to check the label as I wasn't so sure the lovely gal at Benjamin Moore had even mixed the correct color. Then I began to wonder if I even asked for the right color in the first place (if you're still curious...Benjamin Moore wins, Katie loses). So, zero points for me for being lazy and not bothering with a sample. Oh well. You live and you learn. I'm certainly not painting this room again. 

To make a long story even longer, I'm bothered by the fact (but slowly gettting used to it) that the comforter and the wall color are all wrong together. But apart, I feel the love. So since I'm not planning to repaint, or get a new comforter, we'll have to make it work, right? I ordered this fabric from Calico Corners last week. It's the ikat pattern I had in mind, it draws in the deep grays of the wall, and was on sale for $14.99/yard. Score!


I never shop at Calico Corners but did you know (that despite having bolts & bolts of fabric on the walls) you have to order your fabric anyway? I guess it's a new policy or something...or so I was told. But for 2 yards of this stuff (for throw pillows) I was a little miffed they couldn't make an exception for little 'ol me. BTW--it's a week later and still no sign of the UPS man with my fabric...just sayin' Calico Corners...

So there you have it! A little update as to what's going on in our master bedroom. If the weather ever gets a bit warmer & predictible around here, I'll be priming & painting the new nightstands which I'm super anxious to add to the space! When and if that ever happens before June, remains to be seen. But I'll be updating you all along the way!

TGIF!

Blog Design by Get Polished